Start Here to Make a Useful COVID-19 Tracker with Node.js
If you’ve been wanting to learn Node.js, why not let pandemic worries spur you to action? Let’s build a Web application to display the latest COVID-19 statistics. Never fear, we’ll make it simple and fun.
Before beginning this tutorial, you will need Node.js, NPM, Git, andVisual Studio Code installed on your computer. If you need help, use my tutorial on configuring a development environment.
Getting Started
Open your Terminal (Windows users type cmd in your Start Menu to find it). Make a directory for your new app, and open it in Visual Studio Code.
mkdir covid19-tracker
cd covid19-tracker
code .
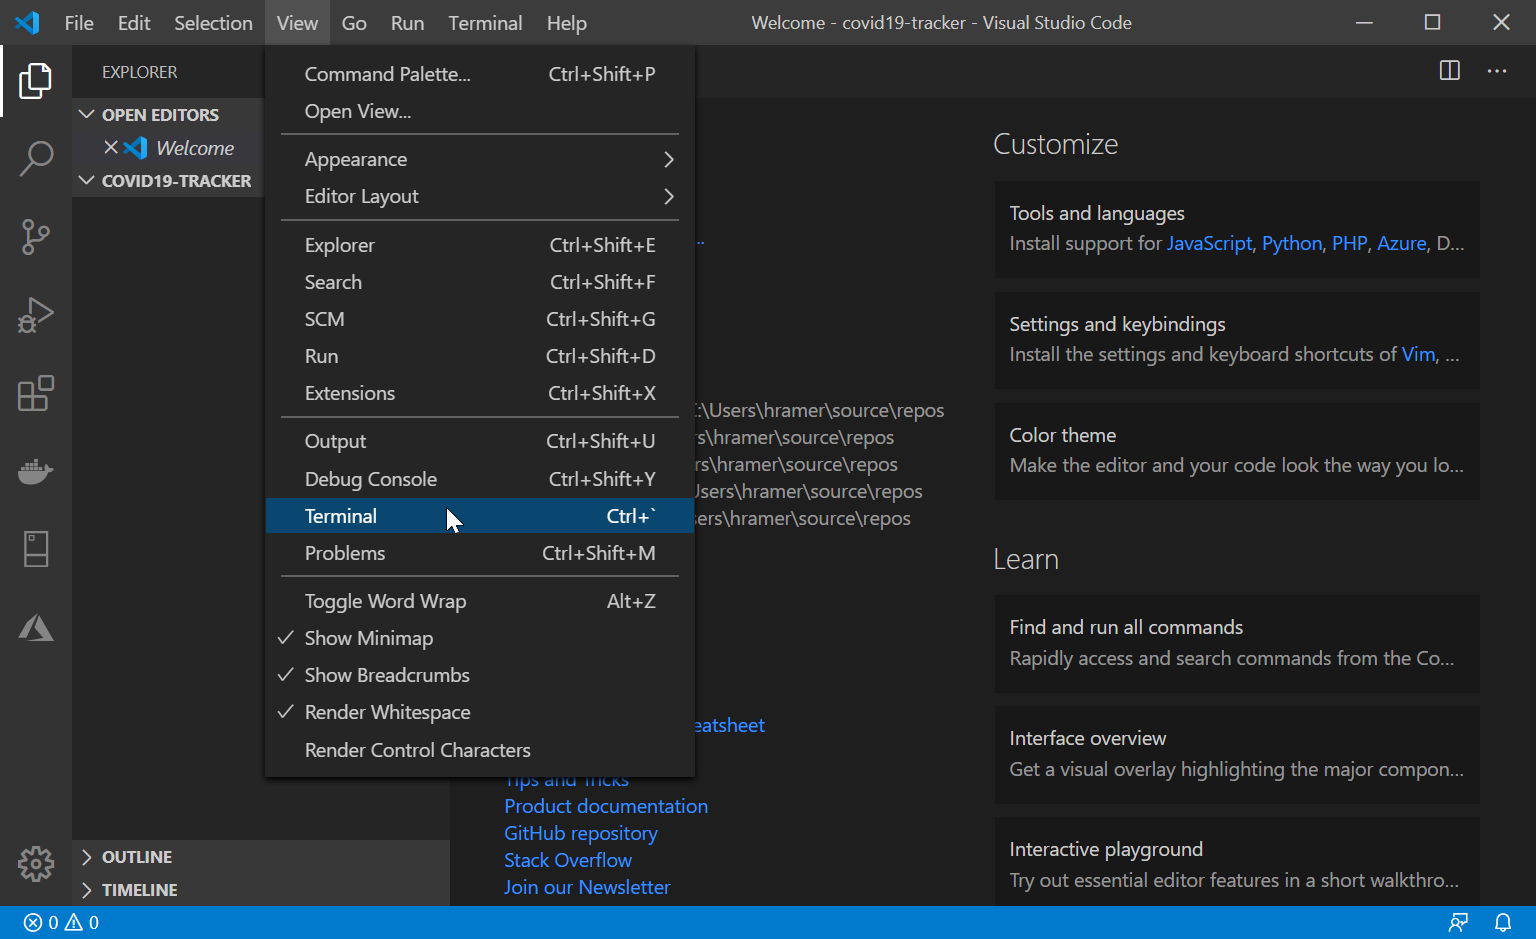
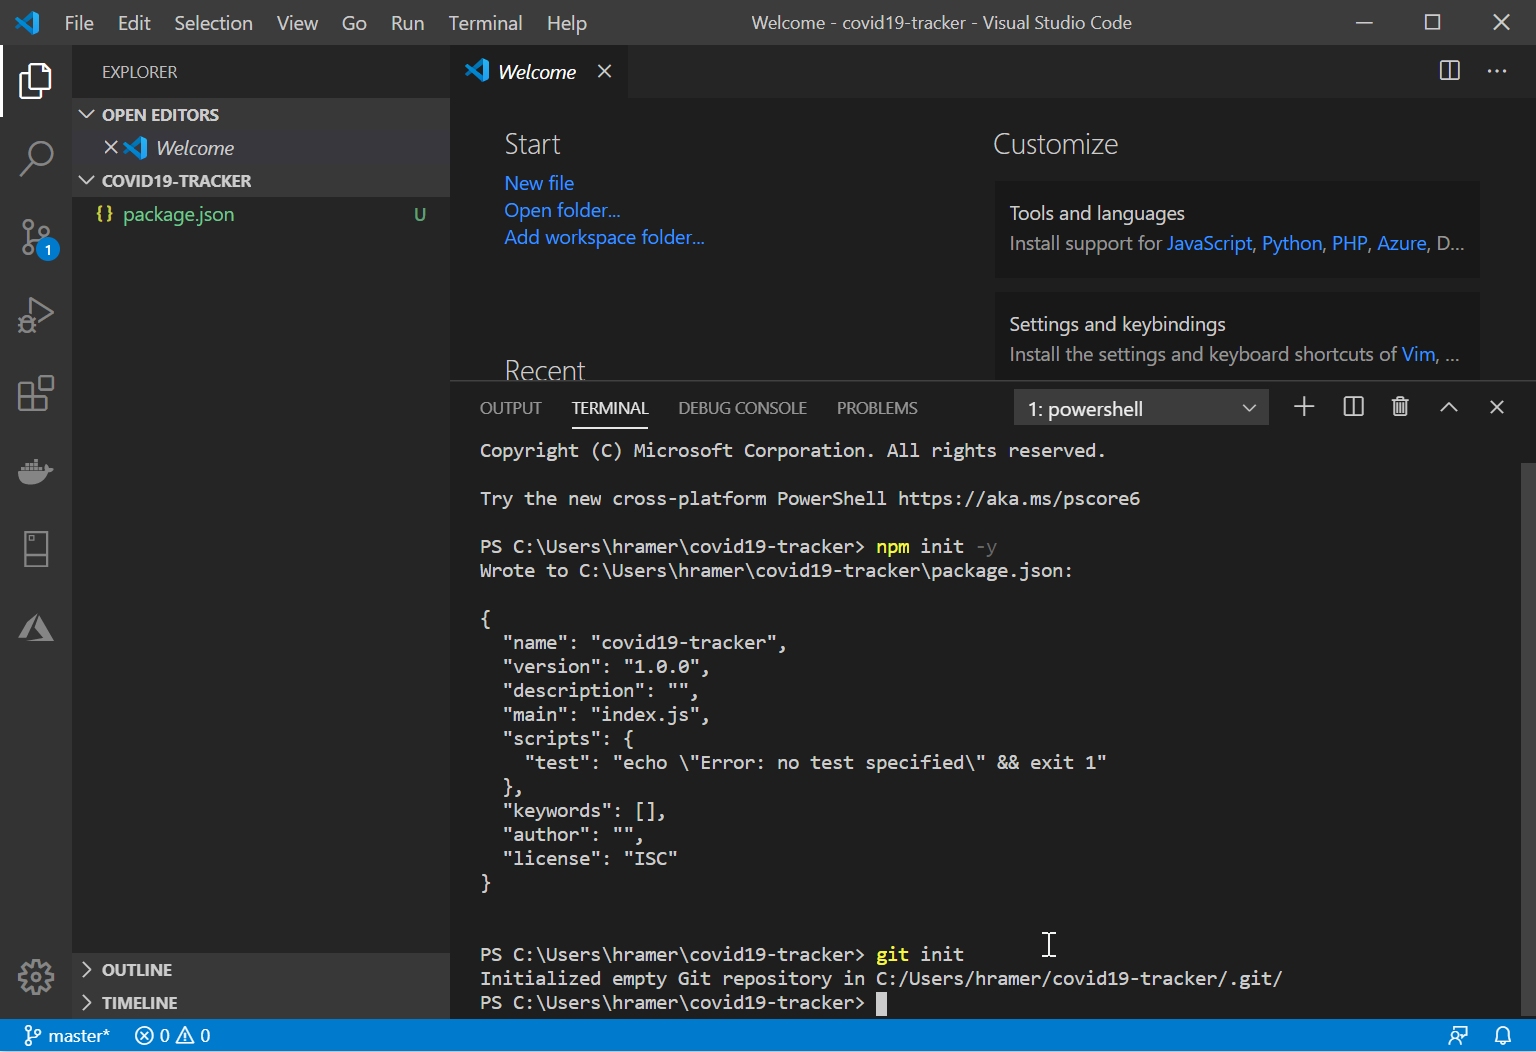
In Visual Studio Code, open the terminal (Ctrl+` ) to initialize your new project.

npm init -y
git init

Install Express.js, Axios, and Pug
Now that we’ve initialized the project, we’ll install some dependencies with the Visual Studio Code terminal.
- Expressis a simple-to-use JavaScript framework used for API and Web application development. We will use it to handle our HTTP requests and direct URL routes to our Node.js functions.
- Axios is a powerful tool for making requests to other servers. We will use Axios to retrieve our COVID-19 data from a public API.
- Pug compiles data to HTML. It will be useful.
npm install express axios pug --save

Hello World
Create an empty index.js file in the terminal.
mkdir src
cd src
echo "" > index.js
This command will display some errors as it creates your file, but it will succeed. This is a handy shortcut for creating files in code. It may come in handy later. You will see your new src directory and file in the File Explorer.
Open your empty index.js file and let’s start writing some code!
Our First Code
Copy and paste (Ctrl+C Ctrl+V) the following code, and save your index.js file.
const express = require("express");
const app = express();
const port = 3000;

app.get("/", (req, res) => res.send("Hello World!"));

app.listen(port, () => console.log(`Example app listening at http://localhost:${port}`));
Next, open the package.json file and add "start": "node src/index", to the scripts block. The result should look like this:
{
  "name": "covid19-tracker",
  "version": "1.0.0",
  "description": "",
  "main": "index.js",
  "scripts": {
    "start": "node src/index",
    "test": "echo \"Error: no test specified\" && exit 1"
  },
  "keywords": [],
  "author": "",
  "license": "ISC",
  "dependencies": {
    "axios": "^0.19.2",
    "express": "^4.17.1"
  }
}
Remember to save both your index.js and package.json files.
Test the Hello World App
In the Visual Studio Terminal, start the Express server via the NPM script we created.
npm start

Open http://localhost:3000 in your browser.

Ok. Now that you’ve tested your app, let’s shut down your server. In the terminal, Ctrl+C and your server will stop running.
Handle Two Different Routes
In your src directory, create a file named routes.js. In your terminal, if you are already in the src directory, do this.
echo "" > routes.js
Next, open your routes.js file, and paste this code:
var express = require("express");
var router = express.Router();

// Home page route.
router.get("/", function (req, res) {
  res.send('Hello World. Learn <a href="/about">about this app</a>');
});

// About page route.
router.get("/about", function (req, res) {
  res.send('About this COVID-19 Tracker. Go <a href="/">home</a>');
});

module.exports = router;
As you can see, this defines two routes. One at / and the other at /about. Open index.js and make the following changes.
const express = require("express");
const routes = require("./routes");
const app = express();
const port = 3000;

app.use("/", routes);

app.listen(port, () => console.log(`Example app listening at http://localhost:${port}`));
Above, we are importing our new routes.js file as a module. We have also configured the application to use our routes.js module with an app.use function call. To test these changes we will start our server again.
npm start
Open http://localhost:3000 in your browser and click the about this app link to load the About page. These simple pages demonstrate a fully-functioning Web server responding to HTTP requests. This the foundation on which the Web is built!

Housekeeping: Versioning Our Code
Before we move on to write some exciting code, let’s commit our files to Git so we can make changes without losing any of our past work. In Visual Studio Code Terminal make sure you are in the root of your project. The path in your terminal should look something like C:\Users\hramer\covid19-tracker and not like C:\Users\hramer\covid19-tracker\src. If it looks like the latter, cd.. will fix your problem.
Let’s commit our code changes.
git add .
git commit -m "A hello  world Web app"

COVID-19 Tracker
We have created the framework we need to build our COVID-19 Tracker. Let’s build the real thing! First, we should make this look more like a real Web app. In Visual Studio Code Terminal, let’s use a library called Pug to help us manage our HTML. We used NPM to install Pug when we started this tutorial.
You can learn more about getting started with Pug. Let’s add our Pug views: one for each page, and a layout helper to manage the code shared by both views.
cd src
mdkir views
cd views
echo "" > home.pug
echo "" > about.pug
echo "" > layout.pug
cd..
mkdir public
cd public
echo "" > style.css
cd..
You should see your new Pug files in the src/views directory, and an empty style.css file in the src/public directory. Copy the code below into your style.css file and save it.
body {
    margin: 0;
    padding: 0;
}
html {
    font-size: 14px;
    font-family: Arial, Helvetica, sans-serif;
}
.container {
    width: 90%;
    margin: 0 auto;
    padding: 2rem 0;
}
section {
    padding: 1rem;
}

.cards {
    display: flex;
    flex-wrap: wrap;
}

.card {
    flex: 1 0 500px;
    box-sizing: border-box;
    margin: 1rem 0.25em;
    padding: 0.5rem 1rem 1rem;
    background-color: #e5e5e5;
    border-radius: 0.5rem;
}
.row {
    overflow: hidden;
}
.row > * {
    width: 33.33%;
    float: left;
}
.card h4 {
    margin: 0;
}
.card .count {
    font-weight: bold;
    text-align: center;
    padding: 1rem 0;
    font-size: 1.25rem;
}
.card .new,
.card .total {
    width: 48%;
    margin-right: 2%;
    padding: 1rem;
    border-radius: 0.5rem;
    border: 1px solid black;
    box-sizing: border-box;
}
.card .new {
    background-color: #fff;
}
.card .total {
    color: #fff;
    background-color: #000;
}
.card .recovered .total {
    color: #fff;
    background-color: green;
}

@media screen and (min-width: 70em) {
    .card {
        max-width: calc(50% - 1em);
    }
}

@media screen and (min-width: 110em) {
    .card {
        max-width: calc(25% - 1em);
    }
}
Copy the code below into your layout.pug file and save it.
html
    head
        title #{appName}
        style
            include ../public/style.css
    body
        .container
            h1 #{pageName}

            block content
                p This page doesn't have any content yet.
Copy the code below into your about.pug file and save it.
extends layout

block content
    p This COVID-19 Tracker uses the publicly available REST API provided by
        a(href='https://www.covid19api.com') covid19api.com
    p Visit the
        a(href='/') home page
Copy the code below into you home.pug file and save it.
extends layout

block content
    .centered
        .cards
            .card
                h2 Afghanistan
                .row
                    .cases
                        h3 Confirmed Cases
                        .row
                            .new
                                h4 New
                                .count 6
                            .total
                                h4 Total
                                .count 24
                    .deaths
                        h3 Deaths
                        .row
                            .new
                                h4 New
                                .count 1
                            .total
                                h4 Total
                                .count 3
                    .recovered
                        h3 Recovered
                        .row
                            .new
                                h4 New
                                .count 1
                            .total
                                h4 Total
                                .count 3
            .card
                h3 United States
                .row
                    .cases
                        h3 Confirmed Cases
                        .row
                            .new
                                h4 New
                                .count 6
                            .total
                                h4 Total
                                .count 24
                    .deaths
                        h3 Deaths
                        .row
                            .new
                                h4 New
                                .count 1
                            .total
                                h4 Total
                                .count 3
                    .recovered
                        h3 Recovered
                        .row
                            .new
                                h4 New
                                .count 1
                            .total
                                h4 Total
                                .count 3
            .card
                h3 Germany
                .row
                    .cases
                        h3 Confirmed
                        .row
                            .new
                                h4 New
                                .count 6
                            .total
                                h4 Total
                                .count 24
                    .deaths
                        h3 Deaths
                        .row
                            .new
                                h4 New
                                .count 1
                            .total
                                h4 Total
                                .count 3
                    .recovered
                        h3 Recovered
                        .row
                            .new
                                h4 New
                                .count 1
                            .total
                                h4 Total
                                .count 3
    p Visit the
        a(href='/about') about page
There is quite a bit going on in these files, feel free to investigate to your heart’s content. We are going on to bigger things. To validate your work, stop your server if it’s running (Ctrl+C in the Visual Studio Code Terminal) and restart it (npm start). When you browse to localhost:3000, you should see something like the view below.

This COVID-19 data is static. We added it inside the home.pug file. Next we will get real data from an API. It is time to preserve all of this hard work. Navigate to the root directory of your project (see above, Housekeeping: Versioning Our Code).
git add .
git commit -m "Static files mocking up our COVID-19 data"
Getting Ready for Real Data
Open the routes.js file and replace the Home Page Route with this code.
// Home page route.
router.get("/", (req, res) => {
  const countries = [
    {
      Country: "ALA Aland Islands",
      CountryCode: "AX",
      Slug: "ala-aland-islands",
      NewConfirmed: 0,
      TotalConfirmed: 0,
      NewDeaths: 0,
      TotalDeaths: 0,
      NewRecovered: 0,
      TotalRecovered: 0,
      Date: "2020-04-09T23:21:34Z",
    },
    {
      Country: "Afghanistan",
      CountryCode: "AF",
      Slug: "afghanistan",
      NewConfirmed: 21,
      TotalConfirmed: 444,
      NewDeaths: 0,
      TotalDeaths: 14,
      NewRecovered: 11,
      TotalRecovered: 29,
      Date: "2020-04-09T23:21:34Z",
    },
    {
      Country: "Albania",
      CountryCode: "AL",
      Slug: "albania",
      NewConfirmed: 17,
      TotalConfirmed: 400,
      NewDeaths: 0,
      TotalDeaths: 22,
      NewRecovered: 23,
      TotalRecovered: 154,
      Date: "2020-04-09T23:21:34Z",
    },
    {
      Country: "Algeria",
      CountryCode: "DZ",
      Slug: "algeria",
      NewConfirmed: 104,
      TotalConfirmed: 1572,
      NewDeaths: 12,
      TotalDeaths: 205,
      NewRecovered: 124,
      TotalRecovered: 237,
      Date: "2020-04-09T23:21:34Z",
    },
  ];
  res.render("home", {
    appName: "My COVID-19 Tracker",
    pageName: "COVID-19 Cases",
    data: countries,
  });
});
In the routes.js file we are creating an array of country objects. You can learn more about JavaScript arrays. Each object has the properties, Country, CountryCode, Slug, NewConfirmed, TotalConfirmed, NewDeaths, TotalDeaths, NewRecovered, TotalRecovered, and Date. We will use most of these properties in our view.
Now we need to update the home.pug file to take this list of data instead of our hard-coded one. Replace the contents of that file with the code below.
extends layout

block content
    .centered
        .cards
            each val, index in data
                .card
                    h2 #{val.Country}
                    i As of #{val.Date.split('T')[0]}
                    .row
                        .cases
                            h3 Confirmed
                            .row
                                .new
                                    h4 New
                                    .count #{val.NewConfirmed}
                                .total
                                    h4 Total
                                    .count  #{val.TotalConfirmed}
                        .deaths
                            h3 Deaths
                            .row
                                .new
                                    h4 New
                                    .count  #{val.NewDeaths}
                                .total
                                    h4 Total
                                    .count  #{val.TotalDeaths}
                        .recovered
                            h3 Recovered
                            .row
                                .new
                                    h4 New
                                    .count  #{val.NewRecovered}
                                .total
                                    h4 Total
                                    .count  #{val.TotalRecovered}
    p Visit the
        a(href='/about') about page
The view created in home.pug now uses iteration to loop over each of the records in the country list we passed to it in routes.js.
Loading Data from the COVID-19 API
We are almost done with our COVID-19 Dashboard.
Open the routes.js file, and replace the entire Home Page Route (including that big countries array) with the following code.
// Home page route.
router.get("/", (req, res) => {
  const apiUrl = "https://api.covid19api.com/summary";
  const countries = axios
    .get(apiUrl)
    .then((response) => {
      res.render("home", {
        appName: "My COVID-19 Tracker",
        pageName: "COVID-19 Cases",
        data: response.data.Countries,
      });
    })
    .catch(function (err) {
      return console.error(err);
    });
});
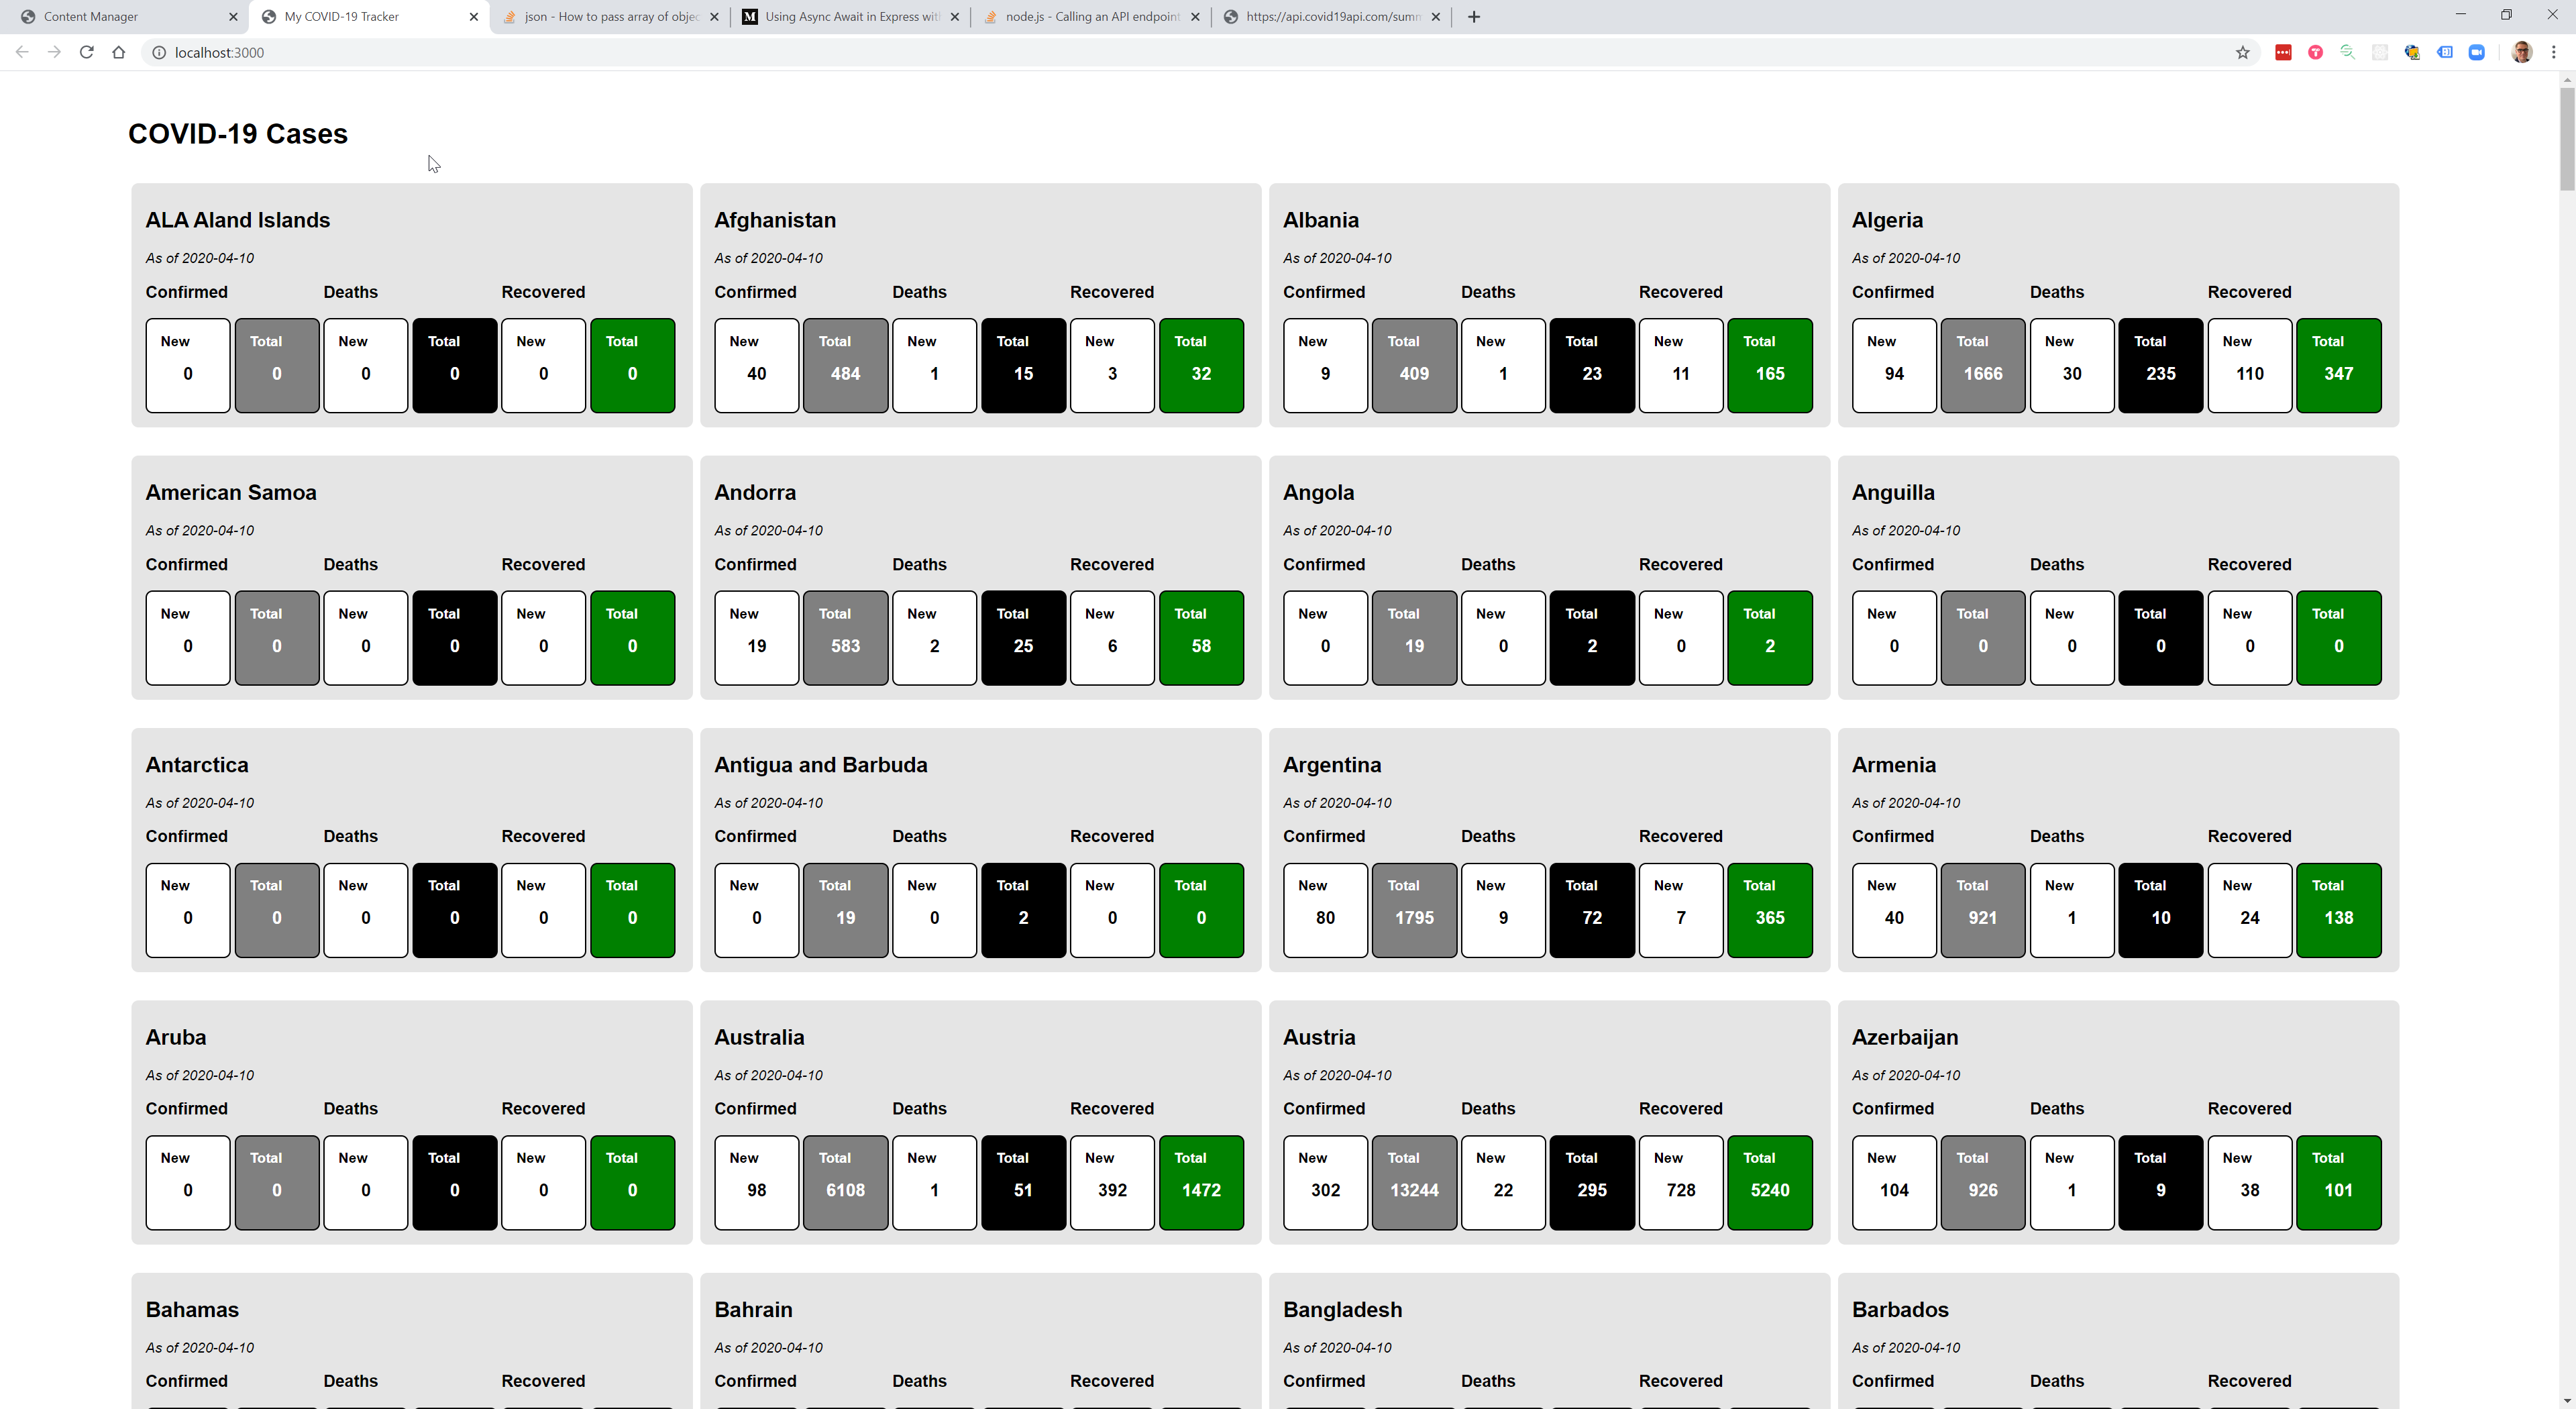
This code makes an asynchronous call to the COVID-19 API and returns the data for our view. When you restart your server and browse to localhost:3000, you should see something like this.

What We Have Learned
In this tutorial, you learned a bit about
- installing Node.js packages via NPM
- using Git to version code
- using Express.js as a Web server
- styling HTML with CSS
- compiling HTML with dynamic data via Pug
- requesting data from an API with Axios
You may have found interesting jumping-off-places to learn more, and I hope you did. You should have your first Web application running. To improve the utility of this demonstration application, make a list of things, and give it a try. Keep coding. It’s always a challenge, but it gets easier. A complete archive of code for this Web app is available on Github. When you’re ready, move on to the next tutorial to add interactivity to your COVID-19 tracker.

